Web Server Installation on CentOS 6 » History » Revision 20
« Previous |
Revision 20/24
(diff)
| Next »
Anchi Cheng, 07/27/2016 10:43 AM
Web Server Installation on CentOS 6
Before you start, make sure you have CentOS 6 installed on your computer. Note that upgrading from CentOS 5 to CentOS 6 might damage existing filesystems and operating systems as described in CentOS Migration Guide. That's why we recommend starting with a fresh install of CentOS 6. The following links provide excellent step by step guide on how to install CentOS 6 Linux from scratch on a new machine:
- http://linuxmoz.com/how-to-install-centos-6-linux-for-servers-desktops
- http://www.if-not-true-then-false.com/2011/centos-6-netinstall-network-installation
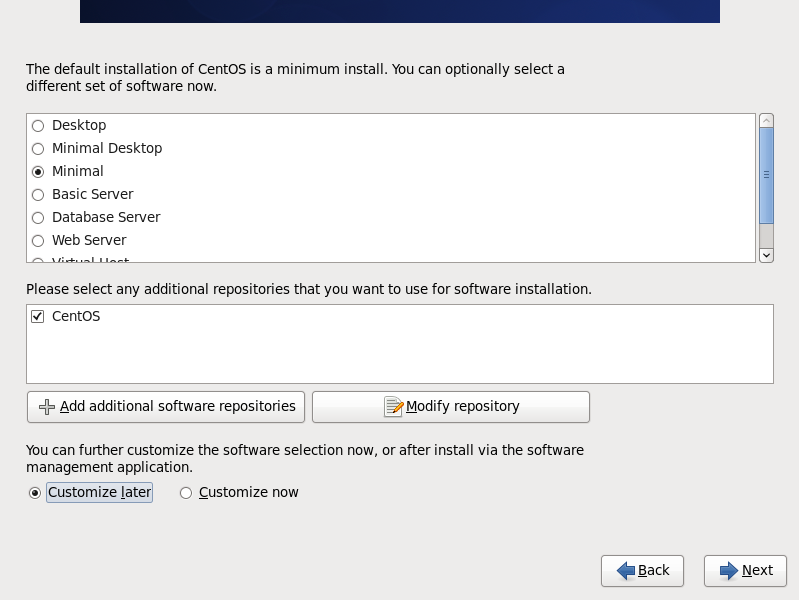
In the package selection step switch from Minimal to Web Server.

Disable SELinux and Firewall
To disable SELinux:
- Edit file "/etc/selinux/config"
- Change "SELINUX=enforcing" to "SELINUX=disabled"
- Save the file
- Restart your computer
To disable firewall run system-config-firewall-tui command and use Space key to unchecked the checkbox next to Enabled.
Install Extra Packages for Enterprise Linux (EPEL)
rpm -Uvh http://download.fedoraproject.org/pub/epel/6/i386/epel-release-6-8.noarch.rpm
Note that release version (6-8) is the current release at the time of this writing. Please visit http://fedoraproject.org/wiki/EPEL/FAQ#How_can_I_install_the_packages_from_the_EPEL_software_repository.3F for more up-to-date information on how to install the packages from the EPEL software repository.
yum install php-gd gcc libssh2-devel php-pecl-ssh2 mod_ssl php-mysql php-devel php fftw3-devel python-imaging python-devel mod_python scipy svn
easy_install fs PyFFTW3
Configure php.ini
Edit /etc/php.ini and change line ~229 to
short_open_tag = On
Note that short_open_tag appears twice in /etc/php.ini and you need to set short_open_tag = On at around line 229 for it to take effect.
Start Apache HTTP Server
service httpd start
chkconfig httpd on
See also: How to start Apache at Startup on Centos or Red Hat Enterprise Linux using chkconfig.
If you have a file server that stores Appion and Leginon session, start and enable nfs services as well:
service nfs start
chkconfig nfs on
See How to Set Up an NFS Mount on CentOS 6
Download Appion and Leginon Files
Download myami (contains Appion and Leginon) using one of the following options:
Option 1: 3.4 version (Current release)
- We have switched to git for version control.
git clone -b myami-3.4 https://emg.nysbc.org/git/myami myami
Note: If you are installing these files on a microscope Windows PC, you may use Git for Windows to clone the files. See notes on configuration note in Here Check compatibility as newer version does not support Windows XP.
Option 2: beta-release version (Used and updated at NRAMM daily with newest features that may not yet documented)
- We have switched to git for version control.
git clone -b myami-beta https://emg.nysbc.org/git/myami myami
Note: If you are installing these files on a microscope Windows PC, you may use Git for Windows to clone the files. See notes on configuration note in Here Check compatibility as newer version does not support Windows XP.
Option 3: Development version (For true developer to play with)
- We have switched to git for version control recently. trunk and future release branches will be available with git clone
- unstable with latest features
This contains features that may still be under development. It is not supported and may not be stable. Use at your own risk.
git clone -b trunk https://your_redmine_username@emg.nysbc.org/git/myami myami
- your_redmine_username is required if you intend and have permission to push changes to our repository. Please ask the development team if you would like to contribute.*
Note: If you are installing these files on a microscope Windows PC, you may use Git for Windows to clone the files. See notes on configuration note in Here Check compatibility as newer version does not support Windows XP.
Install Redux image server
cd myami
./pysetup.sh install
mkdir /etc/myami
cp redux/redux.cfg.template /etc/myami/redux.cfg
/etc/init.d/reduxd start
Install the Web Interface
cp -r myamiweb/ /var/www/html/
Visit http://localhost/myamiweb/setup and follow instructions in Web Tools Setup Wizard.
See also Install the Web Interface Advanced.
Updated by Anchi Cheng over 8 years ago · 20 revisions